

A beautifully finished deck doesn’t just depend on straight board lines and a solid frame — the edges and perimeter details make a significant difference in appearance, durability, and overall quality.
Edge boards — also called deck edge trims — are composite boards installed along the outer edge of a deck to conceal cut ends, protect edges from wear, and give your outdoor space a clean, professional finish.
At PureSolid, we emphasise finishing details like edge boards because they elevate both the visual quality and performance of your deck’s perimeter.

What Is a Decking Edge Board and Why Use It?
A decking edge board is a flat board installed horizontally along the outer edge of decking boards. It serves several purposes:
-
Conceals raw board ends for a polished, architectural look
-
Protects deck edges from moisture, knocks, and abrasion
-
Defines steps, raised areas, and perimeter borders
-
Improves overall visual cohesion of the decking surface
Edge boards work seamlessly with hidden fastening systems to achieve a flush, modern finish that enhances your outdoor space.
Planning Before You Start
Before installing edge boards, homeowners should:
-
Confirm the deck layout and joist positions
-
Allow for expansion gaps between boards
-
Choose the edge board profile that matches the decking style
-
Select compatible fasteners (hidden clips or starter clips)
Important: Always plan for expansion gaps between edge-board butt joints — a minimum of 6 mm (0.2 % of the board length) — to accommodate seasonal temperature changes.
Two Methods of Installing Edge Boards
Depending on how your deck runs, edge boards can be installed parallel or perpendicular to the direction of the decking.
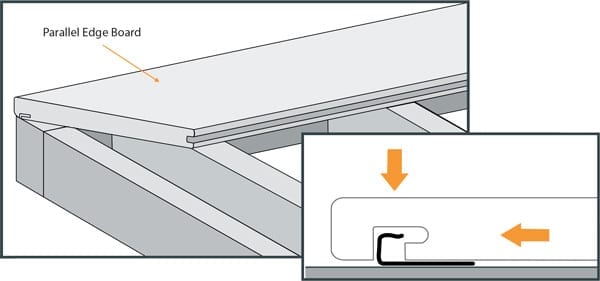
👉 Parallel Edge Board Installation
-
Mitre the ends at corners
Cut the ends of edge boards to 45° mitres where corners meet. -
Secure the board to the joists
Place the edge board over the outer joist edge and use hidden fasteners at approx. 300 mm centres.-
If using a matching fascia board, use 6 mm or 3 mm hidden fasteners at the bottom.
-
If no fascia is planned, you can start with starter fasteners at the bottom edge.
-
-
Align and clip first decking board
With the edge board lightly secured, slide the first decking board into the hidden fasteners. -
Fully tighten fasteners
Once the next decking board is in place, tighten the clips fully to lock everything in position.
👉 Perpendicular Edge Board Installation
-
Mitre the ends at corners
As with the parallel method, mitre the board ends for clean corner joins. -
Install starter clips
Clip starter fasteners on the top side of the outer joist at about 300 mm spacing. The vertical clip edge should be ~35 mm from the joist edge. -
Insert the edge board into the clips
Push the edge board down into the starter clips until fully seated. -
Secure the bottom edge
Use 3 mm or 6 mm hidden fasteners to secure the bottom edge board to the joist.-
Lightly fix if a fascia board will be added later.
-
Fully tighten once the fascia or decking boards are in place.
-
Common Mistakes to Avoid
A professional finish depends on careful execution. Homeowners and builders often make the following mistakes:
-
Over-tightening screws, which can distort boards or clips
-
Cutting boards without precise mitres, leading to visible gaps
-
Forgetting expansion gaps, which causes buckling due to temperature changes
-
Misaligning trims or fascia boards, resulting in uneven edges
Avoiding these errors ensures your deck edge looks consistent and durable for the long term.
Pro Tips for a Seamless Finish
✔ Always measure twice before cutting
✔ Use recommended fasteners that are corrosion-resistant
✔ Leave at least 6 mm gap between edge board butt joints
✔ For steps or raised platforms, ensure edge boards are adequately supported
Attention to these details avoids common issues and creates a professional-looking deck edge that complements the entire space.
Frequently Asked Questions
Do I always need edge boards on a deck?
Not always, but edge boards significantly improve aesthetics and edge protection, especially where decking boards end or steps are present.
Can I use regular decking boards as edge boards?
Yes, in some systems you can use regular decking boards for edge trim, but using purpose-designed edge boards gives a better finish and fit.
Why are expansion gaps important?
Composite boards expand and contract with temperature changes. Small gaps (e.g. 6 mm) prevent buckling or board deformation.
What fasteners are best for edge boards?
Hidden fasteners (e.g., 3 mm or 6 mm clips) are commonly used for a clean, clip-in finish that keeps screws concealed.
Final Thoughts: Complete the Look
Installing decking edge boards is more than just a finishing step — it’s a design detail that defines the quality of your outdoor space. A clean edge not only enhances the visual appearance but also improves edge protection and long-term performance.
At PureSolid, we recommend incorporating edge treatments into your decking plan from the beginning. This helps ensure:
-
Consistent colour match between boards
-
Flush alignment with decking finishes
-
Professional perimeter that resists weather and wear
A well-installed edge board turns a good deck into a great one — elevating both function and style.